| Welcome to Garden Zone, a monthly newsletter for anyone interested in gardening. It's produced by Extension Master Gardener volunteers in Mecklenburg County. View in your browser February Garden Tasks February is for planning and seeing the first signs that spring is around the corner! Don’t forget: GENERAL LANDSCAPE ✳️ It’s a chance to reassess your garden. Consider adding plants or replacing ones that are underperforming. ✳️ Limb-up or “tree-form” large shrubs that may be out of scale with their neighboring plants. ✳️ Mow Liriope and cut back ornamental grasses this month. PERENNIALS, ANNUALS & BULBS ✳️ Plant seeds of Columbine, Foxglove, Coreopsis, Phlox, Daisies and Blackberry Lily. ✳️ Feed pansies in late February. ✳️ Wait until new growth emerges before cutting back Lantana and Salvia. ✳️ Trim away dead leaves and stems from Asters, Coreopsis and Rudbeckia. ✳️ Clean up Lenten Roses and Epimedium. Remove old, dead and dying leaves to reveal the flowers. EDIBLE GARDENS ✳️ Sow seeds of cool-season vegetables, like kale, chard, spinach and peas, after the 15th. LAWN CARE ✳️ Apply broadleaf herbicides NOW, if necessary, for control of chickweed, henbit or other weeds ✳️ Winter annual weeds start to germinate in September, grow slowly through January and February, and begin rapid growth and flowering in March. If you wait until March or April most weeds have grown so large that control is limited without costly and time consuming repeated applications. For The Love of Roses Rose buds begin to swell in anticipation of spring’s warmth. Start watching for this change on Valentine’s Day. These changes on the rose’s stem mark that it is just the right time to give it a lot of love and attention. Pruning too early or too late may well cause a weak plant. ”Old-fashioned” roses and climbing roses should be pruned right after flowering and not in the spring, as these bloom on the previous year’s growth. Check the link below to help identify the type of roses you are growing. Wear thick gloves to protect your hands. Start with sharp, clean pruning shears. By-pass shears make a cleaner cut than anvil shears. A best practice is periodically dipping or wiping the shears in rubbing alcohol or other disinfectants to prevent the spread of disease from one cut to another. One goal for pruning is to remove dead, diseased, or damaged canes. Make a diagonal or slanted cut about ¼ inch above an outside bud on a healthy part of the cane. Be sure the center of the cut stem is white and free of disease. Remove any canes that cross each other. Any cuts made to canes the thickness of a pencil or larger must be sealed with nail polish or wood glue. Another goal is to shape the bush by leaving three to five of the healthiest canes to about 15 to 18 inches from the ground. Severe pruning will result in fewer but larger blooms. Replace mulch with 3-4 inches of new organic matter to decrease disease problems. After a job well done, dig into that Valentine’s box of chocolates and wait for the roses to bloom and thrive. References: https://content.ces.ncsu.edu/roses-for-north-carolina Images courtesy of Pixbay Garden Planting / Planning Guides The holidays are behind us and it’s time to start thinking about planning the garden! Yay! The seed catalogs are coming in the mail and you are browsing the internet for all the latest good stuff to grow. So, how do you plan and not be overwhelmed? When can you plant seeds, bulbs, tubers or transplants? What goes in the ground when? Do I start seeds inside or can they go outside? Lots of questions… Well, NC State and our friends at Renfrow Hardware provide some excellent resources to help you as you start your planning. Vegetable Gardening: A Beginner's Guide - If you are new to vegetable gardening, this is a great place to start. Gardening Planting Calendar for Annual Vegetables, Fruits and Herbs in NC - Great spreadsheet that provides an A-Z listing of plants and when to plant throughout the growing season by region (Eastern, Piedmont, Western). Central North Carolina Planting Calendar for Annual Vegetables, Fruits, and Herbs - Provides guidance for growing specifically in our region. Poor Renfrow’s Almanac - Garden of Eatin' - Renfrow Hardware has developed a fun and catchy way to think about planning for a garden! Container Garden Planting Calendar for Edibles in the Piedmont - Small space? No problem. Provides guidance for growing in containers. So no matter your space, there is something for everyone. Start planning and have a great growing year! We’ll be here to help you along the way. And as Janet Kilburn Phillips quotes, “There are no gardening mistakes, only experiments”. Photo courtesy of NCSU Hardy Hibiscus and caring for them Did you know that there are hardy perennial hibiscus that can grow in zone 8 and under? There are some species of hardy hibiscus that do well in both wet and well-drained soil. Some examples are the Hibiscus moscheutos (Hardy Hibiscus), Hibiscus mutabilis (Confederate Rose) and Hibiscus coccineus (Texas Star). The Chinese hibiscus (Hibiscus rosa-sinensis) can only survive in well-drained soil or they will die of root rot. Hardy hibiscus has a shorter bloom season and are best grown between zone 4, where temperatures’ drop below -30F and zone 8 where temperatures can drop to 10 degrees F. Most varieties die back in the winter and new growth emerges from the root tops in the spring. Hibiscus love the sun and soil amended with organic matter. Try to plant the hibiscus where it won’t be exposed to strong winds and space them 2 to 3 feet apart. To encourage re-bloom be sure to remove spent flowers before seed heads are formed. Hardy hibiscus can be pruned backed to 5 inches above ground and divided in early spring. In zone 9, this can be done as early as mid-February. If the plant needs to be divided or transplanted, do so after all blooms have faded and be sure to cut the plant back to one-third its size. This will help the plant survive transplant shock and help the remaining roots (some will be lost in the process) support the mass of the plant. Pictures: EMG Gina Tadle Building A Dry Creek Bed February is one of those months that confuses many gardeners. Too early for this, too late for that. But it can be just perfect for outdoor improvements while the weather is neither too hot nor too cold. One of those tasks for me was doing something to mitigate large, deep puddles in front of my garage doors after any rainfall. The sloping front yard allowed water to course through the lawn and erode the soil, resulting in a wet, muddy mess on the driveway. A dry creek bed has always been a wish of mine, so I rolled up my sleeves and put on my DIY hat. It was not easy, but also not as difficult as I expected and the results were even better than I hoped for. Step-by-step directions are listed after each photo. Step 1: Since I was replacing an existing planted area, the first task was to remove the old plants, till up the soil, and rake the area smooth. Step 2: Lay out the size and shape of the creek using a garden hose (or in my case, some old plastic edging). Then arrange the new plants according to your design. Step 3: Dig out the soil 6"-8" deep and line it with landscape fabric. Keep the fabric in place by tossing in some small rocks. Flat stones from an old path were repurposed for edging. Spread them out nearby so you know how many and what sizes you have. Step 4: Stand the flat stones vertically along the edges of the trench to keep soil from falling in. I then placed a pedestal in the center and leveled it by placing some flat stones underneath it. Step 5: Add river rock into the stream bed. In addition to the load of rock purchased, I selected a handful of larger, more brightly colored rocks with interesting shapes to spread throughout the stream bed for interest. Step 6: Mulch around the new plants, place the top on the pedestal, clean up, and wait for rain. Step 7: Then step back and admire your work - success! No more puddles! Photos by: EMG Sylvia Hindman Pruning Trees If you have planted the right tree in the right place, the need for pruning will be minimized. If possible, do the important pruning and shaping when the tree is young, to establish the best structure. For most trees the best structure will be for it to have a central leader, at least below where the crown will spread out. Competing branches that are as large, or almost as large, as the central leader need to be cut back to a lateral branch further back toward the trunk. Try to do this while branches are no more than 2 inches in diameter. Larger cuts will take longer to heal and may not heal at all. The way the cut is made will make all the difference in whether the tree is able to heal or not. Where each twig or branch leaves the branch or trunk is a node and the only place you can prune and the plant can heal itself. A cut at that place will also leave your tree looking more attractive and with a normal shape. Never leave a stub of a branch, it will not be able to heal itself and will lead to rot. If you, or your lawn service, does a ‘flush cut’ that cuts off the branch collar, that will also not be able to heal and will lead to rot. The branch collar is the area that has the cells that can grow over that cut and seal it. Never use ‘heading’ cuts that are in between nodes on a tree (or shrub if you can help it) and never let anyone ‘top’ or ‘hat rack’ a tree, which will permanently damage it and likely kill it eventually. ‘Topping’ a tree leaves only ‘stubs’ which expose the heartwood without any way for the tree to heal over the wounds. The best time to prune live branches on a tree is late winter or early spring. There will be less chance of disease transmission and it’s easier to see the structure of the tree. Dead branches can be cut out any time. Photos by EMG Jean Wilson |
Welcome to Garden Zone, a monthly newsletter for anyone interested in gardening. It's produced by Extension Master Gardener volunteers in Mecklenburg County.
| |
|
|
February is for planning and seeing the first signs that spring is around the corner! Don’t forget:
GENERAL LANDSCAPE
✳️ It’s a chance to reassess your garden. Consider adding plants or replacing ones that are underperforming.
✳️ Limb-up or “tree-form” large shrubs that may be out of scale with their neighboring plants.
✳️ Mow Liriope and cut back ornamental grasses this month.
PERENNIALS, ANNUALS & BULBS
✳️ Plant seeds of Columbine, Foxglove, Coreopsis, Phlox, Daisies and Blackberry Lily.
✳️ Feed pansies in late February.
✳️ Wait until new growth emerges before cutting back Lantana and Salvia.
✳️ Trim away dead leaves and stems from Asters, Coreopsis and Rudbeckia.
✳️ Clean up Lenten Roses and Epimedium. Remove old, dead and dying leaves to reveal the flowers.
EDIBLE GARDENS
✳️ Sow seeds of cool-season vegetables, like kale, chard, spinach and peas, after the 15th.
LAWN CARE
✳️ Apply broadleaf herbicides NOW, if necessary, for control of chickweed, henbit or other weeds
✳️ Winter annual weeds start to germinate in September, grow slowly through January and February, and begin rapid growth and flowering in March. If you wait until March or April most weeds have grown so large that control is limited without costly and time consuming repeated applications.
| |
|
|
Rose buds begin to swell in anticipation of spring’s warmth. Start watching for this change on Valentine’s Day. These changes on the rose’s stem mark that it is just the right time to give it a lot of love and attention. Pruning too early or too late may well cause a weak plant.
”Old-fashioned” roses and climbing roses should be pruned right after flowering and not in the spring, as these bloom on the previous year’s growth. Check the link below to help identify the type of roses you are growing.
Wear thick gloves to protect your hands. Start with sharp, clean pruning shears. By-pass shears make a cleaner cut than anvil shears. A best practice is periodically dipping or wiping the shears in rubbing alcohol or other disinfectants to prevent the spread of disease from one cut to another.
One goal for pruning is to remove dead, diseased, or damaged canes. Make a diagonal or slanted cut about ¼ inch above an outside bud on a healthy part of the cane. Be sure the center of the cut stem is white and free of disease. Remove any canes that cross each other. Any cuts made to canes the thickness of a pencil or larger must be sealed with nail polish or wood glue.
Another goal is to shape the bush by leaving three to five of the healthiest canes to about 15 to 18 inches from the ground. Severe pruning will result in fewer but larger blooms.
Replace mulch with 3-4 inches of new organic matter to decrease disease problems.
After a job well done, dig into that Valentine’s box of chocolates and wait for the roses to bloom and thrive.
References: https://content.ces.ncsu.edu/roses-for-north-carolina
Images courtesy of Pixbay
| |
|
|
Garden Planting / Planning Guides
| |
 |
The holidays are behind us and it’s time to start thinking about planning the garden! Yay! The seed catalogs are coming in the mail and you are browsing the internet for all the latest good stuff to grow. So, how do you plan and not be overwhelmed? When can you plant seeds, bulbs, tubers or transplants? What goes in the ground when? Do I start seeds inside or can they go outside? Lots of questions… Well, NC State and our friends at Renfrow Hardware provide some excellent resources to help you as you start your planning.
Vegetable Gardening: A Beginner's Guide - If you are new to vegetable gardening, this is a great place to start.
Gardening Planting Calendar for Annual Vegetables, Fruits and Herbs in NC - Great spreadsheet that provides an A-Z listing of plants and when to plant throughout the growing season by region (Eastern, Piedmont, Western).
Central North Carolina Planting Calendar for Annual Vegetables, Fruits, and Herbs - Provides guidance for growing specifically in our region.
Poor Renfrow’s Almanac - Garden of Eatin' - Renfrow Hardware has developed a fun and catchy way to think about planning for a garden!
Container Garden Planting Calendar for Edibles in the Piedmont - Small space? No problem. Provides guidance for growing in containers.
So no matter your space, there is something for everyone. Start planning and have a great growing year! We’ll be here to help you along the way. And as Janet Kilburn Phillips quotes, “There are no gardening mistakes, only experiments”.
Photo courtesy of NCSU
| |
|
|
Hardy Hibiscus and caring for them
| |
Did you know that there are hardy perennial hibiscus that can grow in zone 8 and under?
There are some species of hardy hibiscus that do well in both wet and well-drained soil. Some examples are the Hibiscus moscheutos (Hardy Hibiscus), Hibiscus mutabilis (Confederate Rose) and Hibiscus coccineus (Texas Star). The Chinese hibiscus (Hibiscus rosa-sinensis) can only survive in well-drained soil or they will die of root rot. Hardy hibiscus has a shorter bloom season and are best grown between zone 4, where temperatures’ drop below -30F and zone 8 where temperatures can drop to 10 degrees F. Most varieties die back in the winter and new growth emerges from the root tops in the spring.
Hibiscus love the sun and soil amended with organic matter. Try to plant the hibiscus where it won’t be exposed to strong winds and space them 2 to 3 feet apart. To encourage re-bloom be sure to remove spent flowers before seed heads are formed. Hardy hibiscus can be pruned backed to 5 inches above ground and divided in early spring. In zone 9, this can be done as early as mid-February.
If the plant needs to be divided or transplanted, do so after all blooms have faded and be sure to cut the plant back to one-third its size. This will help the plant survive transplant shock and help the remaining roots (some will be lost in the process) support the mass of the plant.
Pictures: EMG Gina Tadle
| |
February is one of those months that confuses many gardeners. Too early for this, too late for that. But it can be just perfect for outdoor improvements while the weather is neither too hot nor too cold. One of those tasks for me was doing something to mitigate large, deep puddles in front of my garage doors after any rainfall. The sloping front yard allowed water to course through the lawn and erode the soil, resulting in a wet, muddy mess on the driveway.
A dry creek bed has always been a wish of mine, so I rolled up my sleeves and put on my DIY hat. It was not easy, but also not as difficult as I expected and the results were even better than I hoped for. Step-by-step directions are listed after each photo.
Step 1: Since I was replacing an existing planted area, the first task was to remove the old plants, till up the soil, and rake the area smooth.
Step 2: Lay out the size and shape of the creek using a garden hose (or in my case, some old plastic edging). Then arrange the new plants according to your design.
Step 3: Dig out the soil 6"-8" deep and line it with landscape fabric. Keep the fabric in place by tossing in some small rocks. Flat stones from an old path were repurposed for edging. Spread them out nearby so you know how many and what sizes you have.
Step 4: Stand the flat stones vertically along the edges of the trench to keep soil from falling in. I then placed a pedestal in the center and leveled it by placing some flat stones underneath it.
Step 5: Add river rock into the stream bed. In addition to the load of rock purchased, I selected a handful of larger, more brightly colored rocks with interesting shapes to spread throughout the stream bed for interest.
Step 6: Mulch around the new plants, place the top on the pedestal, clean up, and wait for rain.
Step 7: Then step back and admire your work - success! No more puddles!
Photos by: EMG Sylvia Hindman
| |
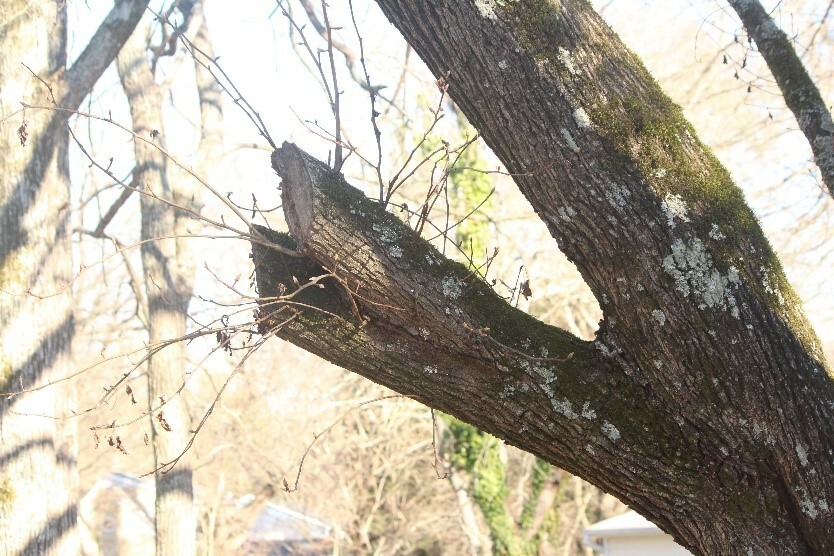 |
If you have planted the right tree in the right place, the need for pruning will be minimized. If possible, do the important pruning and shaping when the tree is young, to establish the best structure. For most trees the best structure will be for it to have a central leader, at least below where the crown will spread out. Competing branches that are as large, or almost as large, as the central leader need to be cut back to a lateral branch further back toward the trunk. Try to do this while branches are no more than 2 inches in diameter. Larger cuts will take longer to heal and may not heal at all.
The way the cut is made will make all the difference in whether the tree is able to heal or not. Where each twig or branch leaves the branch or trunk is a node and the only place you can prune and the plant can heal itself. A cut at that place will also leave your tree looking more attractive and with a normal shape.
Never leave a stub of a branch, it will not be able to heal itself and will lead to rot. If you, or your lawn service, does a ‘flush cut’ that cuts off the branch collar, that will also not be able to heal and will lead to rot. The branch collar is the area that has the cells that can grow over that cut and seal it.
Never use ‘heading’ cuts that are in between nodes on a tree (or shrub if you can help it) and never let anyone ‘top’ or ‘hat rack’ a tree, which will permanently damage it and likely kill it eventually. ‘Topping’ a tree leaves only ‘stubs’ which expose the heartwood without any way for the tree to heal over the wounds.
The best time to prune live branches on a tree is late winter or early spring. There will be less chance of disease transmission and it’s easier to see the structure of the tree. Dead branches can be cut out any time.
Photos by EMG Jean Wilson and Images by PlantGalore
| |
This is a well-healed old pruning job. | | |
Like our content? Share it with friends and neighbors! They can subscribe here. | |
Follow us on Social media | |
|
|
|
|
The Mecklenburg Extension Master Gardener Volunteer (EMGV) program operates under the Mecklenburg Center of the NC Cooperative Extension Service (NCCES), a part of NC State University and NC A&T State University.
NCCES is a part of Mecklenburg County Park and Recreation.
| |
| |
|
NC State University and N.C. A&T State University commit themselves to positive action to secure equal opportunity and prohibit discrimination and harassment regardless of age, color, disability, family and marital status, gender identify, genetic information, national origin, political beliefs, race, religion, sex (including pregnancy), sexual orientation and veteran status. NC State, N.C. A&T, U.S. Department of Agriculture, and local governments cooperating. | |
|
|
| |
|


